 Qtractor An Audio/MIDI multi-track sequencer
Author: G3N-es.
Difficulty level: Advanced.
In Qtractor the default way of automating is by tracks. Each track allows you to view only one automation at a time. However sometimes we need to automate buses, or view several layers (tracks) of automation at the same time. Is this possible? Yes, of course.
Qtractor offers modular functionalities. If we relate them together creatively we can achieve almost anything we need.
In this case the modules are:
The basic concept for automating buses is:
We encounter two obstacles:
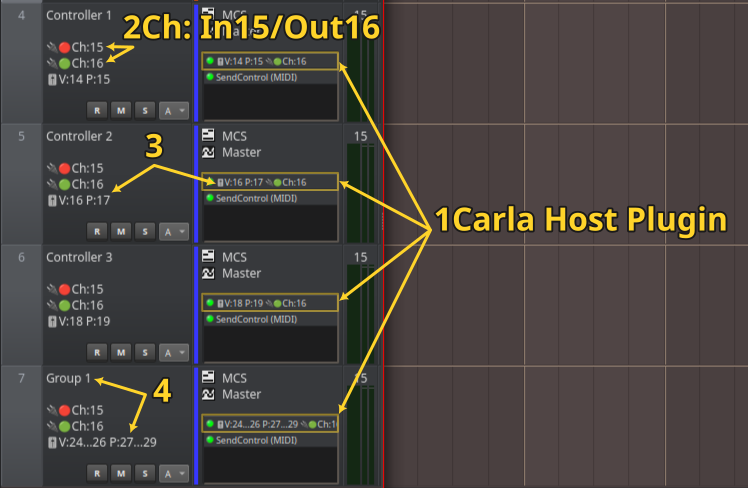
These obstacles are solved with “midi filtering plugins”, and a “host plugin” that prevents midi signal leaks.
Filtering and interconnecting MIDI signals is a very broad, complex and technical thing. It takes several books to explain it. Therefore, this tutorial has the following focus:
This is more manageable than having to explain the why and how of each connection and filter. This template allows you to have an “Automatable Midi Controller Surface” within Qtractor. This is the power of modularity in Qtractor. It allows us to create workflows that work almost like a native functionality developed in C++.
In Qtractor activate: Options > MIDI > Control > “Dedicated input/output for midi control”. Open “MIDI-ContollerSurface.qtt”.
To avoid Qtractor crashing due to MIDI event leaks we must take the following precautions:

Let’s imagine that we want to automate the Master audio bus Gain fader. The “Controller 1” track indicates that its Gain fader outputs CC14 on channel 16.
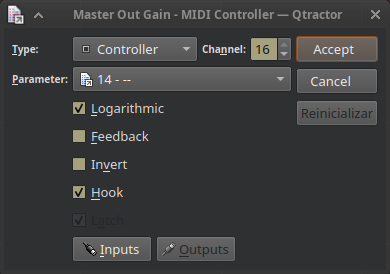
Right-click on the Master audio bus Gain fader:

Assign Type Controller, Channel 16 and Parameter 14.
Logarithmic and Hook must be checked.
Move the “Controller 1” Volume fader: We see that they are already linked.
If we want, we can automate the “Controller 1” Volume fader, and therefore, since they are linked, the Master bus Gain fader. To automate tracks, consult the Qtractor manual: 4.6.8. Automation
Correct settings by destination controller type:
Trick Crossfader: To perform crossfader, control several elements from a Group and checked the option “Invert” on the one you want to crossfade.
To add Controller/Group tracks, duplicate the existing ones and modify the CC number into Carla in edit parameters.
Recommended Assignable CC:
To avoid conflicts we recommend using only “general purpose controllers” and “non-predefined controllers”. This would be the available list: 3,9,14…31,41,46…63,85…90,102…119
Remember to also edit the plugins name, the Carla’s alias and the track name with the new CC number to always have the information clear at sight and avoid confusion.
To modify the existing Controller/Group tracks, act in an analogous way.
It may seem cumbersome, but the goal should be to create custom presets, and once you’ve set them up you don’t have to touch them again.
Once you’ve got everything just right, you can save each track configuration as a preset. Track presets are saved by right-clicking on the “plugin box” > Export. And they are loaded by right-clicking on the “plugin box” > Import. You can also save a preset for the entire session by saving it as a template.
You can also try to perform different types of filtering for different functionalities.
For example:
You can create a configuration to control devices external to Qtractor (synthesizers, lighting devices, motors, etc). In these cases channel filtering is not necessary, because there is no risk of looping.
The potential is endless.